Yoga Anatomy of Lotus Posture: Key Muscles and Benefits in Yoga
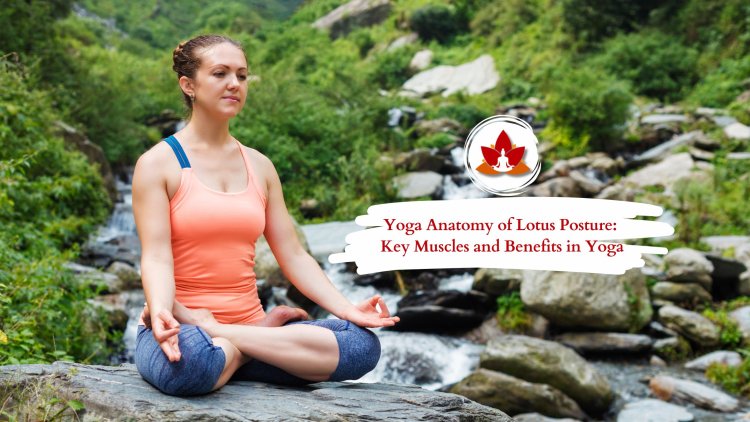
Padmasana (Lotus Pose), or the lotus position, is a foundational yoga asana that has been given the English name Lotus Pose.
It has been so named because of the incredible benefits it provides. The pose gives the soul the feeling of divinity, purity, and light like a lotus flower and also opens the outer hips. Also, when a person performs this yoga asana, even for 10-15 minutes each day, his soul glows and blooms like a lotus flower, as it allows for free flow of energy.
Padmasana (lotus pose) is one of hatha yoga poses. It has been described as the basic yoga pose for all yogis and is usually performed after the perfection of Virasana (Hero Pose). It is a sitting posture with an upright spine that is mainly adopted for meditation and mindfulness exercises. In this posture, the student sits with an erect spine, legs crossed, and feet resting on the opposite thighs such that hip joints and the knee joint remain open and relaxed.
Padmasana : Historical and Spiritual Significance in Yoga and Meditation
Historical Significance
Padmasana with a significant historical origin, holds a notable position in the main yogic scriptures such as the Yoga Sutras of Patanjali, Hatha Yoga Pradipika, and Bhagavad Gita. It
has been applied for centuries as the ideal position for meditation and
pranayama because it provides stability and grounding. Indian sages, Buddhist
monks, and spiritual seekers have long accepted Padmasana as a posture that
increases inner calmness and concentration.
Spiritual Significance
In meditation practice, the lotus pose aims to bring the chakras into alignment, specifically the Muladhara (root) and Sahasrara (crown) chakras. It creates a balance between the Worldly and Divine. Meant to instill an element of awareness and to quieten the mind, the lotus pose allows for profound meditation via the enhancement of physical stability.
In terms of the Hindu and Buddhist symbolism, the gods and enlightened individuals are usually seated in Padmasana, which in turn symbolizes its connotation of spiritual insight and transcendence. The regular practice of the lotus pose or Padmasana will help develop patience, concentration, and a calm mind – the essential ingredients that ultimately lead to spiritual development.
Why Understanding the Anatomy is Crucial for Safely Achieving this Posture
Understanding the body's anatomy is essential if you want to safely achieve the Padmasana (Lotus Pose).It involves complex joint movements as well as muscle engagement. This posture demands significant external rotation of the hip joints. On the other hand, the limited flexibility in this area could create excessive strain on the knees. Since the knee joint itself does not rotate, forcing it into position without sufficient hip mobility gives rise to the risk of ligament injuries. In addition, proper foot alignment—such as flexing the feet—helps protect the ankles from overstretching. It is equally important to keep the core engaged and further maintain pelvic stability so as to preserve spinal alignment and also reduce the lower back strain. By understanding these anatomical principles hence, practitioners can thereby progress safely, modify the pose as and when needed. They can thus minimize the risk of injury and achieve the posture's meditation benefits.
Understanding the Lotus Pose
Although the Lotus Pose has advantages such as increased flexibility and better concentration, it should be prepared carefully to prevent strain, particularly for beginners. Gradual practice and warm-up exercises can effectively and safely help one attain this pose.
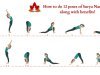
5 Tips for Building Your Lotus Pose - A Step-by-Step Guide
Take your own pace and work on these steps as part of the complete asana practice while ensuring that adequate preparation has been done so as to be ready for those deeper stretches.
Don't proceed to the next step until you are able to practice the one before with the facility. Even when you feel comfortable in the steps that come before, never forget to warm up to, and practice up to, lotus each time you plan to do so.
STEP 1: Breathe (Seriously)
Sit down on your mat in a relaxed manner. Lengthen your spine. Breathe in deeply and slowly through both nostrils with your mouth shut. Throat muscles tighten the breath, as if fogging up a mirror or telling a secret. Exhale slowly and completely through both nostrils; the slight sound that comes up could be like an ocean or that you are, in fact, fogging up a mirror.
If you find it difficult to maintain smooth, conscious breathing while performing any of the poses that follow, that is a sign that it is time to slowly exit the pose.
STEP 2: Self-acceptance
Take a blanket or a block and have it in reach. Kneel on the floor with your knees close together (or slightly farther apart if that feels more natural to your pelvic shape). Slide your feet outward so that they are about wider than your hips, toes extending straight back behind you. Push your toenails and the top of your feet down into the ground evenly. Slowly sink your buttocks down toward the ground. If they don't quite reach it, no matter: put the blanket or block under you, as necessary, for support. Remain here for a maximum of 30 seconds as you do your mindful breathing; you can work your way up to holding this pose for longer periods with practice.
STEP 3: Bound Angle Pose
Start in dandasana, a tall seated position with your legs out in front of you (if your lower back starts to round, sit on the edge of a folded blanket (or two!) that will help you keep your lower back in its natural curve). Bring your knees up towards your chest as you bring your feet as close to your groin as is comfortable. Then allow your knees to open slowly apart from one another and bring the soles of your feet together. Release your thigh bones toward the ground: don't push them down—let gravity work for you. Regular practice of bound angle pose is a necessary foundation for full lotus.
STEP 4: Half Lotus Pose
From dandasana, rotate your right leg out, then bend the right knee, pointing the knee outward so your right heel can come back toward your pubic bone to fully flex, or "close," the knee joint before lifting your foot up onto your thigh.
Now, keeping your toes active, use both hands to hold the right ankle and foot (so the foot does not sickle), and lift the foot carefully and set it on top of your left thigh, as near your hip crease as is comfortable. Then externally rotate your left leg, bend the knee of that leg, and pass your left shin under your right for half lotus. Let your thighs sink toward the ground as you extend the crown of your head up toward the ceiling. Hold for as long as is comfortable for you, keeping your smooth, conscious breath. Then change legs and hold for the same amount of time. Note: Some anatomy experts recommend curling your ankle and foot up to support the knee. Do what works for you.
STEP 5: Full Lotus Pose
Start as for half lotus. Sit on the floor with your legs stretched out in dandasana. Rotate the right leg outward and then bend the knee, pulling your right heel back toward your pubic bone so that the sole of your right foot presses against your left inner thigh, completely flexing or "closing" the knee joint. Supporting the right ankle and foot with both hands, lift the foot and put it on your left thigh, as near as you feel comfortable to the left hip crease. Sit up tall and continue to lengthen through your spine. There is no necessity to force yourself into full lotus if your body is not yet prepared. Allow approaching this posture to teach you how to be precisely where you are meant to be.
Common Modifications and Variations
For easy execution of Padmasana (Lotus Pose) or making the practice profound, a few modifications and changes are useful. The beginners can begin with Ardha Padmasana (Half Lotus Pose) where one leg is placed upon the other thigh and the other leg on the ground, saving the knees. Extra support can be given by sitting on a rolled blanket or yoga block which is able to lift the hips as well as align the spine better. Supporting the ankles with a cushion will also be more comfortable. Variations for those seeking more challenge are Bound Lotus (Baddha Padmasana), in which the hands hold the opposite toes behind the back, or Padma Matsyasana (Lotus Fish Pose), in which Lotus is combined with a backbend. More advanced yogis will even attempt arm balances like Padma Mayurasana (Lotus in Peacock Pose) in attempts to strengthen and concentrate. Gradual adjustment or advancement, hearing the body out and gradually progressing is the foundation of safely practicing Padmasana.
Benefits of Lotus Pose for Meditation, Breathing techniques (Pranayama), and Energetic Alignment
The Lotus Pose is a strong meditation, breath control (Pranayama), and energy alignment tool. It keeps the back straight, which stabilizes the body and the mind, making it suitable for meditation. Standing upright positions the spine in its natural position, with the energy flowing freely down the center channels of the body, reaching further out and into inner peace. For Pranayama, the open chest and firm base allow for deeper, controlled breathing, which oxygenates and quiets the nervous system. The Lotus Pose is also reputed to stimulate important energy points, enhancing balance and harmony in the body and mind.
Anatomical Breakdown of the Lotus Pose

Primary Joints and Muscles Used
In the Lotus Pose, various primary joints and muscles are coordinated to form balance, comfort, and stability.
-
Hips: Your hips have the primary responsibility. They should rotate out and be flexible enough to facilitate the folding of your legs comfortably. Building this flexibility gradually is the actual key to preventing strain.
-
Knees: Because your knees are so deeply bent in this pose, they should support and stabilize themselves with the strength of the muscles around them. So entering the pose with more care will help safeguard them.
-
Ankles: Your ankles should be mobile yet aligned correctly to place each foot firmly on the opposite thigh. This creates greater comfort and thus reduces the element of strain.
-
Spine: Having a straight spine is crucial when it comes to the Lotus Pose. Utilising your core muscles keeps your back straight and your posture firm, enabling you to sit for longer durations.
Key Muscle Engagement
A number of key muscle groups are involved to aid in the Lotus Pose, thereby allowing for more stability, comfort, and alignment.
-
Hip Flexors (such as the Iliopsoas and Tensor Fasciae Latae) assist in moving your hips into the required outward rotation, while enabling your legs t:o fold comfortably.
-
Gluteus Muscles offer the required amount of stability and aid in hip rotation, which in turn ensures that you stay balanced in the pose.
-
Quadriceps act as a protective measure . They support the knees, thus making them safe in their flexed position.
-
Core Muscles are essential in order to keep your torso straight. They pave the way for a stable base which is needed for meditation or breathwork.
-
Erector Spinae muscles are along your spine, contracting to keep it in its natural curve and letting your back be extended and comfortable.
Flexibility and Mobility Requirements
Hip-Opening Stretches to Try
No matter whether you sit in front of a computer all day or train for professional races, you're open to tight hips (and all the negative side effects that follow). The good news is, though, that hip-opening stretches can loosen you up and allow for smoother movements without pain—no wonder then that they crop up in a variety of forms of yoga and stretching exercises. Try these Hip-Opening Stretches that you can give-a-go:
Pigeon Pose (Kapotasana)
1. Begin in Downward Facing Dog Pose (Adho Mukha Svanasana).
2. Move your weight forward as you draw your right knee towards your right wrist. Draw your right foot to the left side of the mat and curl your toes.
3. Stretch your left leg out behind you with your hips still forward and facing forward.
4. Fold forward over your right bent leg, and hold. Then, change sides.
Butterfly Pose (Baddha Konasana)
The Butterfly Pose is a gentle hip opener and works best when you want to unwind.
1. Sit with the soles of your feet together and knees out.
2. You can keep the leg position as you lean back to rest on the floor.
3. Let go of your knees toward the ground, using pillows behind your head or beneath your knees for support as per the need.
Knee Protection Strategies
To be able to safely practice the Lotus Pose, it becomes important that you prepare your knees with mindful stretching and strengthening techniques.
-
Gentle Stretching for Knee Ligaments: Since the knees rely heavily on the surrounding muscles and connective tissues for support, gentle stretches that target the ligaments can improve flexibility and reduce strain. Here it may be noted that the movements are more slow and controlled.
-
Ankle Flexibility Drills: Flexible ankles are essential. They help position your feet comfortably in the Lotus Pose. Incorporate exercises that improve both dorsiflexion (i.e bringing your toes toward your shin) and plantar flexion (i.e pointing your toes downward). These can enhance your range of motion and reduce pressure on the knees.
The consistent practice of these techniques is said to help protect your knees. It ensures that you can approach the Lotus Pose in a safe and comfortable manner.
Common Misalignments and How to Avoid Them
It is crucial that you practice the Lotus Pose with the right alignment so as to prevent discomfort and injury. Here are some common misalignments and ways to rectify them:
-
Knee Misalignment: If you place too much pressure on the inner knee, you are making a common mistake. To avoid this, prioritize hip flexibility before forcing the knees into position. You can opt for hip-opening warm up exercises and ensure your knees feel supported rather than strained.
-
Spinal Rounding: If you slouch or round the back, it can cause discomfort and limit deep breathing. So focus on engaging your core muscles and lengthening via the crown of your head. This will keep your spine upright and neutral. Sit on a cushion or yoga block. This also helps maintain proper alignment.
-
Ankle Instability: If the foot positioning is not properly done, it could strain the ankles. To ensure stability, rest the tops of your feet securely on the opposite thighs with your ankles in a neutral, relaxed position — neither overly flexed nor limp.
-
Uneven Weight Distribution: Do not lean too much to one side. This can create imbalance and discomfort. To stay centered, ground both sit bones evenly into your mat or cushion. Visualize your spine as a vertical axis. It will help you when it comes to maintaining proper balance.
Therapeutic Benefits of the Lotus Pose
-
Improved Hip Flexibility and Joint Health: The regular practice of the Lotus Pose is said to encourage mobility in the hips and strengthen the surrounding muscles.
-
Enhanced Concentration and Meditation: A stable posture promotes better focus and improved clarity on a mental level as well.
-
Stimulation of the Sacral and Root Chakras: The Lotus Pose is believed to activate energy centers, thereby maintaining the aspects of emotional balance and grounding.
-
Emotional Grounding and Stress Relief: As this pose is calm in nature , you will feel reduced anxiety and inner peace from within.
Safety Tips and Precautions
-
Avoiding Injuries: Never force your legs or hips into position. Gradual practice is what ultimately matters!
-
Using Props: Props like yoga blocks, bolsters, or cushions can provide added support in case you realize that your hips or knees feel strained.
-
Listening to Your Body: What are your limits? Analyse them and avoid pushing through pain. Remember flexibility is something that develops over time.
-
Consult a Yoga Instructor: Do you have a history of knee, hip, or ankle injuries? If so, then seek guidance to modify the pose safely.
Final Thoughts
The Lotus Pose can be your Power Asset that can bring you physical stability and mental calmness. As you practice it in a mindful and consistent mode, you will see it progress on a gradual note. As flexibility demands time, it is absolutely essential that you value the element of patience. And to delve deep into the practice of it, you may consider looking into the additional resources that could be in the form of yoga books, guided videos, and so on for expert guidance.
What's Your Reaction?