7 Effective Yoga Pose for Cervical Neck Pain Relief

Cervical pain, often associated with neck pain, is a common problem nowadays, many people suffer from cervical neck pain because of long sitting hours, bad sitting posture, or degeneration of disc due to age as well. The common symptoms of this pain is stiffness in the neck area which makes it difficult to rotate your neck. Sometimes you get headaches along with numbness and tingling sensation in your arms as well. In today's digital world with the rising screentime the number of people who face this issue is increasing a lot.
Even doctors and physiotherapists suggest specific yoga poses for cervical neck pain.these gentle yoga practices stretch and strengthen your neck and shoulder muscles, improves your range of mobility,and eventually relieve from the neck pain. In this blog we will talk about 7 yoga poses for cervical pain. That is particularly beneficial for your neck pain condition and you improve your quality of life.
What is cervical pain? And its cause:
Cervical pain is discomfort in the upper part of the spine right below our head. Cervical spine is made of seven small bones called vertebrae and they are stacked on top of each other from C1 to C7 representing the first 7 vertebrae of our spine.understand the structure of the cervical spine is important especially for who who is having cervical neck pain.
Cervical neck pain can arise from various factors such as bad posture, prolonged sitting, herniated disk, degenerative disc due to the natural aging process and stress. By incorporating specific yoga asanas for neck pain into your daily routine, it can help you to alleviate these symptoms, improve spinal health and enhance overall mobility.
7 Yoga Poses for Neck Pain Relief:
Here are the list of 7 yoga poses for neck pain relief
Cat-Cow Stretch (Marjaryasana-Bitilasana)
Steps:
- Start on your hands and knees with your wrists directly under your shoulders, and your knees directly under your hips. Point your fingertips to the top of your mat. Place your shins and knees hip-width apart. Center your head in a neutral position and soften your gaze downward.
- Begin by moving into Cow Pose: Inhale as you drop your belly towards the mat. Lift your chin and chest, and gaze up toward the ceiling.
- Broaden across your shoulder blades and draw your shoulders away from your ears.
- Next, move into Cat Pose: As you exhale, draw your belly to your spine and round your back toward the ceiling. The pose should look like a cat stretching its back.
- Release the crown of your head toward the floor, but don't force your chin to your chest.
- Inhale, coming back into Cow Pose, and then exhale as you return to Cat Pose.
- Repeat 5-20 times, and then rest by sitting back on your heels with your torso upright.
Benefits of Cat Cow pose:
Doing Cat cow pose increases the flexibility of the entire spine. The movement helps in stretching the muscles of neck, shoulder, chest and upper back. back, abdomen and chest. Additionally it helps to release the tension in the neck and upper back, making it highly beneficial for relieving cervical pain.
2. Child's Pose (Balasana)
Steps:
- Kneel on the yoga mat with your shins and feet flat.
- Touch your big toes together and sit on your heels.
- Spread your knees as wide as your hips.
- Inhale and exhale slowly, allowing your shoulders to relax
- Lower your upper body onto your thighs on an exhale
- Extend your arms out in front of you with your palms face down on the mat
- Relax your head and chest down toward the floor
- Narrow your hip points toward the navel
- Broaden across the back of your pelvis at the sacrum
- Lengthen your tailbone away from the back
- Tuck your chin slightly
Benefits of the Child pose:
Doing the Child's pose will be very beneficial in your daily routine if you struggle with cervical pain. It helps to stretch and relax the neck muscles and shoulders. Not only does it improve your posture but also reduces stress which greatly helps in neck pain.
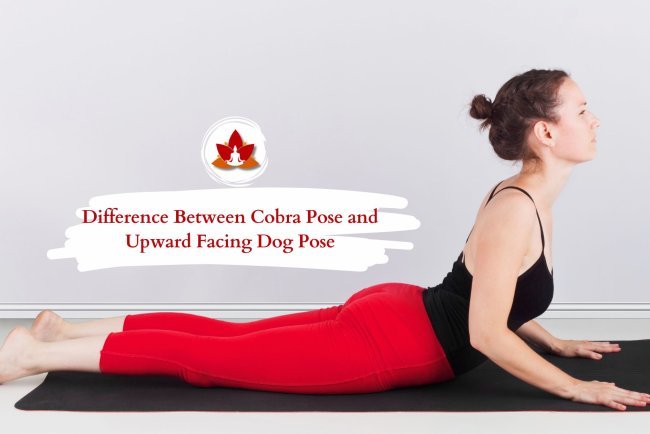
3. Cobra Pose (Bhujangasana)
Steps:
- Lie on your stomach with your toes pointing back and your hands under your shoulders
- Extend your big toes back and press down with your toenails
- Engage your thighs and gently lift your knees off the floor
- Draw your shoulder blades back and drop your shoulders away from your ears
- Keep your neck straight or turn your head toward the sky
- Raise your torso from the ground using the support of your hands
- Put equal pressure on both palms and raise only your upper body as you breathe in
- Continue to put pressure on your hands and keep moving up till your hands are fully extended
- Arch your back to the maximum extent possible
- Lift your chest from the back of your heart
- Keep your neck long and focus on lifting your sternum instead of your chin
- Straighten your arms while keeping your shoulders away from your ears
- Breathe out to release the move as you lower your body back to the ground
Benefits of the Cobra pose:
Practicing Cobra pose daily helps in strengthening the spinal muscles, along with the neck and upper back. It also helps you improve your posture and reduce stress on the cervical spine. When you perform a cobra pose you lift your chest and arch your back, which stretches the neck and shoulder muscles. This helps to alleviate the tension and stiffness of cervical pain.
well stretch the muscles in the neck and shoulders. This helps in reducing tension and stiffness of the cervical pain.
4. Extended Triangle Pose (Utthita Trikonasana)
Steps:
- Stand facing the long side of your mat with your feet about a leg distance apart.
- Turn your right foot out so your toes are pointing to the short edge of the mat and turn your left toes in, about 45 degrees. You are looking for stability through both legs.
- Engage your legs and roll the right thigh out so the right knee is in line with the first two toes.
- Lengthen through both sides of the waist, draw your lower belly in and up and lift your arms parallel to the floor.
- Inhale as you reach to the right, extending your body over your right leg, shifting your hips towards the back of the mat. Exhale as you bring your right arm down, placing your hand either on the leg, the floor or a block. Rotate your ribs towards the ceiling.
- Point the left arm straight up to the ceiling, hand in line with your shoulder, palm facing forwards
- Lengthen through the sides of the neck, keeping your neck in line with your spine. Look straight ahead, or tuck the chin slightly and turn to look up towards your left hand.
- Keep your face relaxed and breathe gently as you keep pressing through the feet, extending through fingertips and crown of the head, and rotating your ribcage.
- To come out, press your feet firmly into the floor, inhale and reach your left arm up to the ceiling as you come back to standing straight.
- Pivot your heels and repeat on the other side.
Benefits of the Extended Triangle pose:
The extended triangle pose can be beneficial for those who are suffering from cervical pain as the muscles are stretched and strengthened, and improve posture, and enhance overall body alignment. Specifically the twisting movement of the triangle pose targets the cervical spine, helping to stretch and release the tension in the neck and shoulders. This helps in neck pain relief and increased stability, making it an effective practice for managing cervical pain.
5. Thread the Needle Pose (Parsva Balasana)
Steps:
- Lay down a yoga mat or find a soft carpeted area for comfort.
- Start on all fours on the ground. Make a tabletop with your body: Stack your hips directly above your knees and position your elbows, shoulders, and wrists in a straight line perpendicular to the ground.
- Lift your right hand up sending your gaze up with it and then follow your right hand down as you thread it beneath your left arm.
- Sink into the stretch by keeping your hips high while allowing your chest to rest on or come close to the ground. Push your hips back and up and keep some pressure in your left palm to avoid crunching your neck.
- Hold the position as long as you’d like—a few seconds up to an entire minute—and then switch sides.
- To come out, press firmly into your left palm and slowly unthread your right arm reaching back up towards the sky, the gaze can follow. Return your right hand down to the ground back on the tabletop. Repeat on the left side.
Benefits of the Thread the Needle pose:
The Thread the Needle pose, also known as Parsva Balasana is highly beneficial for cervical pain relief. It targets the thoracic part of the spine, which often gets stiff from prolonged sitting hours from work and daily office activities. This posture not only helps to relieve the tension from the neck, shoulder and upper back but also improves thoracic spine mobility. Additionally it also helps in relaxing the body and calming the mind.
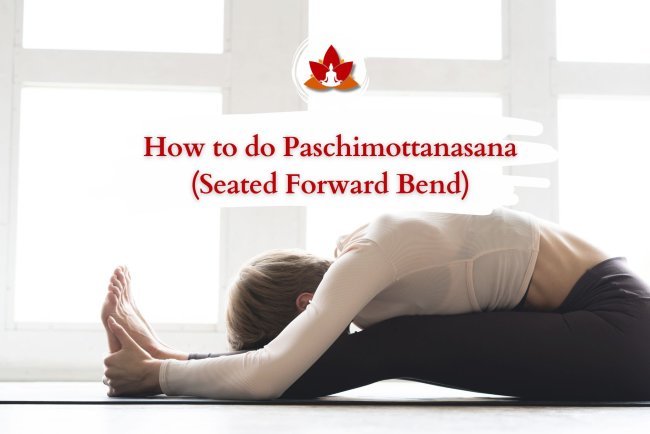
6. Seated Forward Bend (Paschimottanasana)
Steps:
- Bring your arms straight out to the sides and over your head, reaching toward the ceiling.
- Inhale and draw your spine up long.
- As you exhale, begin to come forward, hinging at your hips. Imagine your pelvis as a bowl of water that is tipping forward.
- On each inhale, lengthen your spine. You may come a bit out of your forward bend to do this.
- On each exhale, deepen into your forward bend. Imagine your belly coming to rest on your thighs, rather than your nose coming to your knees. This will help you keep your spine long.
- Keep the neck as the natural extension of your spine, neither cranking it to look up nor letting it go completely.
- When you have come to your full extension with the spine long, decide whether you want to stay here or let your spine round forward.
- Take hold of your ankles or shins, whichever you can reach. You can also use a strap around your feet. Keep your feet flexed strongly throughout.
Benefits of the Seated Forward Bend:
The seated forward bend, also known as Paschimottanasana, is beneficial for alleviating cervical pain by extending and stretching the lumbar spine.
7. Bridge Pose (Setu Bandhasana)
Steps:
- Lie on your back with your knees bent, your feet flat on the floor, and your arms alongside your body.
- Position your feet hip-width apart and as close to your glutes as you can.
- Press the soles of your feet into the floor.
- Inhale and lift your hips off the floor, pressing your upper arms down and your collarbones broad.
- Roll your shoulders under you and keep your head, neck, and shoulders flat on the floor.
- Continue to press down through your feet and draw your thighs toward each other to keep them hip-width apart.
- Reach the backs of your thighs toward your knees to lengthen your spine.
- Hold the pose for 5 to 15 breaths.
- To come out of the pose, exhale as you release your hands and slowly lower yourself to the mat.
- Benefits of the Bridge Pose:
- Setu bandhasana, also known as bridge pose, is an effective yoga pose that helps to stretch and strengthen the spine by doing backward movement. This pose particularly helps in relieving the mild back aches associated with neck strain. Additionally the bridge pose increases spinal flexibility, including the cervical region, helping to remove the stiffness and relief in neck stress.
Yoga Poses To Avoid With Herniated Disc
People with herniated discs or bulged discs often fear practicing yoga to avoid any further injury. A herniated disc is typically caused by intense flexion movements of the spine or lifting heavy objects. For those with a herniated disc, private instruction is highly recommended to ensure the safety, however if practicing in a group classes or at home certain yoga poses should be avoided. Here is the list of yoga poses to avoid with herniated disc to maintain your safety during practice.
-
Paschimottanasana(seated forward bend)
-
Uttanasana(standing forward bend)
-
Prasarita padottanasana(wide leg forward bend)
Is Yoga Good For Degenerative Disc Disease?
Is Yoga Good For Degenerative Disc Disease? Absolutely, yoga is very helpful tool in managing degenerative disc disease(DDD) providing a variety of gentle movements, stretches and mindfulness to improve spinal health.daily practice of yoga can not only alleviate the pain and stiffness connected to DDD but also increases the flexibility and strength of the muscles which supports the spine.
What's Your Reaction?


